Friday, February 3, 2017

Inspiration - The Art of Glen Keane

This is one of my favorite drawings of all time. Not because of detail, refinement, or rendering... but because of what it communicates; because of the story it tells.
This drawing was done 27 years ago by Glen Keane in an early pencil test for the Transformation scene in Beauty & the Beast, and lately I look to it daily for inspiration. The motion and movement, the staging and composition, the depth and emotion, create such a beautiful masterpiece.
Glen has said that, "A drawing is like a seismograph of the soul," and that very concept is displayed here so well.

As I spend the next several months focusing on Computer Animation, I will be discovering how to infuse 3D animations with such a level of passion. The medium is different, but I am convinced that if the passion behind it is the same, it can create works of art that are just as powerful.

Have you, in your life, found ways to express passion through different mediums in ways that might have surprised you?


The link below will take you to the transformation scene as it was originally done on pencil and paper by one of the most incredible animators of our time.


Update & New Demo Reel

It has been some time since I have posted here, and as I look back through my old blog posts, I am amazed at how far I have come. The things that once were so profoundly incredible and complicated to me, I realize were simply stepping stones that have pushed me to a place of much greater technical and artistic abilities.

Though I wish to display only my best work online, I think I'll keep this page up here as a testament to the journey and to show how far you can go with hard work and persistence.

While in school, I have been studying every part of the Animation Pipeline, there are two areas in particular which have captured my imagination and my heart: Modeling and Animation.

Modeling because you have the innate power to create something from nothing, to give it physical accuracy, and to infuse it with extreme detail. Digital sculpting is one of the most incredible, technical, challenging, and freeing things I have ever dedicated myself to, and I absolutely love it.

Animation because of the incredible ability to give life to something formerly inanimate; to express emotion through a character.

As I move forward throughout these next several months, I will be modeling in much of my free time while primarily focusing on animation.

But before I do that, I would like to share with you what I worked on this last Holiday season. I began in September and worked on these models up until January to create my first Demo Reel. It was a lot of work, but it was so incredibly rewarding. I hope you enjoy it.

Remember to pursue everything you with passion, integrity, and authenticity.


Friday, September 23, 2016

Creating a Chocolate Fountain Using Viscous Fluids in Houdini

In the creation of the Viscous Fluid project, I decided to create a chocolate fountain. I chose chocolate, as it is a relatively thick flowing liquid.
I gathered my reference and began working to match it from the very beginning.
The goal was to create a thick flowing fluid that would match the speed, reflectivity, and consistency as what is seen in the photo above. I decided it would be fun to attempt dipping something into the chocolate as the strawberry is being put in the chocolate above. For time’s sake, I chose to go with a marshmallow.

I began modeling in Maya to create the chocolate fountain, and decided to give it an extra tier to add to it a little bit.


I created the fluid emitter and decided first to work on correcting the collisions. Despite how complex creating the actual physical fluid is, getting the collisions to work correctly has been one of the more difficult and important parts of Houdini projects in my experience.

In the FlipFluid Object in the Autodop Network, I set the Collisions Volume Offset to 0 and checked “Use Point Velocity for Collisions.”
On the Chocolate Fountain’s Shape itself inside of the Autodop Network, I turned off “Use Volume Based Collision Detection” in the RBD Solver, and set the Geometry Representation Bullet Data to “Concave.” With the Collision Padding and Angular Threshold set to 1 and the Linear Threshold set to 0.8, I found that I got very effective Collisions with the object.


One of the biggest struggles of the project was perhaps the very next step, which was making the liquid emit out of the top of the fountain as though it was being pushed upwards.
After about an hour of finagling and struggling to get it to emit correctly, I finally found the exact perfect placement of the emitter in the top of the fountain.


Set at this height above the Fountain Object, the emitter would emit into the little bowl at the top, the bowl would fill with particles relatively evenly, and they would spill over the edges. If the emitter was set even a fraction of a number higher, they would splash out of the top. If the emitter was any lower, the particles trying to push their way up out of the bowl would fight with the particles falling downward, pressure would seem to build, and the particles would shoot up into the air like a vertical upward fountain.
This exact positioning caused a nearly perfect emission, and this is what I stuck with for the remainder of the project.

After making the fluid Viscous, I turned the Velocity up to the recommended 1000 to get a good amount of thickness in the liquid. When playing back the simulations, I felt it was still too watery, so I turned the Viscocity up to 1200. This gave me, what I felt, was a very good result.


I set the Particle Separation to 0.1, and both the Particle Radius Scale and Grid Scale to a value of 2. This gave me a very good flow.  I did not lower the Particle Seperation because I did not want to increase my render times and simulations, as they were already becoming quite slow. It was giving me a decent look, so I felt good about it.


The next problem I was running into was that when the chocolate was falling from one tier to the other, it was bouncing off of the next tier rather than just landing on it and staying. It wasn’t bouncing a ton, but just enough to make it bypass the next tier after the chocolate fell again. This did not match my reference at all.
You can see in the picture below that the liquid is falling off of the second tier too quickly, and is bypassing the third tier. I needed to find a way to keep that from happening.


The next thing I did to solve that problem was readjust the Density.
I realized that turning down the Density made the liquid fall down straighter and more inward rather than outward, and turning up the value of the liquid did the exact opposite. I found that a Density value of 500 helped out a lot, and decided to keep it there.

Changing the Density helped, but my particles were still not reacting to hitting the surface quite the way I wanted them to. To further fix this, I put a value of 0 in the Bounce Attribute on the Fountain’s geometry.

After changing the Viscosity Scale several times and doing some testing, I found that a Viscosity Scale set at a value of 2 seemed to be the most effective.

The liquid was continuing to bounce just a little bit and wasn’t quite falling the same way the chocolate was, so on the Flip Fluid Object, I set the Bounce to 0, Bounce Forward to 0.9, and Friction to 0.3.

I also wanted to cause the liquid to have only a sleight amount of stickiness without turning on the “Stick on Collision,” so I set Surface Extrapolation to 0.7 and that gave the liquid a perfect amount of stickiness and roll on the fountain’s surface.

To get the Chocolatey look that I wanted, I set the Diffuse color to a mid-level brown, set the Diffuse Intensity to 0.105, and the Roughness to 0.257. I set the Specular Intensity in Reflections to 0.756, with a skin-tone pink as the specular reflection color. The Refraction Intensity was set to 0.01, and the Refraction Minimum set to 0.24. With the Opacity turned up to 1, I got a very good chocolate look upon rendering.

I set the camera up and animated it moving in a circle around the fountain, so you get almost a 360 degree view throughout the rendered final.


I don’t know what my problem was, but for some unknown reason, my files would not Cache properly, therefore I never got a cache that went beyond a couple hundred frames, (and my simulation lasted 500 frames.) So I could not scrub through the scene properly and see what it would look like beginning to end.
Because the chocolate falls perfectly and thickly off the first tier within the first couple hundred frames, I assumed that it would work correctly going down the other tiers.

For other unexplained reasons, Houdini would not allow me to do a Flipbook/Playblast at ALL. I have been able to do them in the past, but this time I was hitting strange errors no matter what I would change in the settings. This was a problem I tried tirelessly to resolve, but could not.


Therefore, I had no clue how it would look all the way through.

This affected me negatively in the final due to how clumpy and goopy it looks near the bottom of the fountain. At the top of the fountain, (the part which I was able to visualize), the chocolate falls in perfect sheets, but not quite so much so near the bottom.

Overall, the render turned out okay, and the whole thing was alright. But I wish I the computing power to render things more quickly and to be able to visualize things correctly before rendering. I did not have this luxury, therefore did not know what the end of the clip and last half of the simulation would look like.

I placed a Distant Light and an Environment light into the scene and put simple materials on all other objects in the scene.

The render took about 17 hours, and by then I knew I did not have the time to correct things, but I know that if I was to return to the project, I may turn up the emission rate, set the Viscocity slightly lower, and turn down the Particle Separation Rate to a lower number.


Overall, I am not extremely happy with the results, but I did learn from the trial and error. 


Saturday, August 13, 2016

Rigid Body Objects and Simulations in Maya

The study of motion simulation in Maya for special effects has been an extremely fascinating one. I appreciate that the simulations in Maya work in a similar manner to what I’ve worked with in Houdini in the past.The project I approached this week was similar to the rudimentary Marble Machine simulation featured in the blog post below.The majority of the scene was created by other artists and was very basic. The object was to get the entire machine to create a chain reaction of some sort from beginning to end.

In simulations, you have to primary functions you can add to each individual piece of geometry, and you assign them depending on what you want that object to do.
An Active Rigid Body can be assigned to a piece of geometry that you want to move and to be affected by the world in which it exists. In the simulation you will view below, all of the objects you see move were Active Rigid Bodies.
All of the objects which come into contact with, and have effect upon the Active Rigid Body objects, are Passive Rigid Body objects. These are objects that we want to interact with, but do not require movement or any extreme dynamics. These objects are not controlled by forces such as gravity, which we will talk about later. Passive Rigid Body objects primarily exist to interact with our items in motion while remaining absolutely motionless. Though a Passive Rigid Body does not move, it is not entirely without its own dynamics. The surface of the object still maintains dynamic attributes that can be changed, such as friction and bounciness. So while our focus in the creation of this machine is primarily on the Active Rigid Body objects, the attention to the settings on the Passive objects will end up being just as important to the final product.

An object which has neither of these (not Active, nor Passive) will not interact with the Active and Passive items at all. Instead, when an Active Rigid Body object hits a piece of geometry that has no dynamic effect attributes applied to it, they will simply pass through one another like ghosts, with no effect.

If you are having trouble understanding this, simply view the video at the bottom of this post.
The hammer, which you will see swinging is an Active Rigid Body object, as is the marble and the cog. But the surface the marble rolls on and the other static objects which interact with our active objects are Static Rigid Body objects.

Now when we create either of these objects and simply push play on the timeline, which begins the simulation, you will see that absolutely nothing happens. That is because we have not applied any fields to these objects. By selecting the object, such as the active rigid body object which you want to move, and then applying a Gravity field, you can cause the object to move when you click play on the timeline. It is now affected by gravity and begins to fall. Gravity will only affect the objects which it has been assigned to. So you can apply a Gravity field to a marble, and have a completely different Gravity field applied to the Dominoes right next to it. That gravity field holds it's own attributes. Most namely, the Magnitude attribute, which controls the strength of the gravity field applied to the object. Multiple objects can also share the same gravity field by connecting them in the Dynamic Relationship Editor that the lovely people at Autodesk have been so wonderful as to create for us.

Before I get into explaining more about the fields that can be applied to objects, I'll explain how constraints work.

Without Constraints, our objects would simply fall or fly through space. Constraints allow us to do very cool things, and they are featured all throughout the scene below. Nearly every Active Rigid Body object in the scene has a constraint applied to it.
There are Barrier constraints, Hinge Constraints, Point Constraints, Pin Constraints, Nail Constraints, and Spring Constraints.
On the Hammer, you will see that it swings as though it is hanging from something. It is hanging from a Hinge Constraint which is set up like a nail going through the handle of the hammer. The cog that the ball hits gives the illusion that it is sitting in the small peg of geometry in the center of the cog, but it's actually not attached to anything other than a constraint. It is another hinge constraint with a pivot point that has been placed directly in the center of the cog, so that the cog can rotate freely around it. There is also a hinge constraint on the large rotating object at the end of the dominoes. On the Mallet which swings upward and knocks over the cup that contains the marbles, there is a Rigid Pin Constraint. The Pin Constraint works almost like a lightbulb hanging from a string, and it must be created between two different objects. I primarily only used these two constraints throughout the scene, with the exception of the Spring Constraint which causes the plate that launches the ball near the end of the scene to spring upward so sharply. That plate contains both a Spring Constraint and a Hinge Constraint.

Another force used in this scene, in addition to Gravity, is a Uniform Field. A Uniform Field essentially will pull certain assigned objects in a specific desired direction. I was having trouble getting the three marbles that roll out of the cup to roll into the next required area, so I applied a Uniform Field, and keyframed it so that it turns on when the marbles would have begun to slow down, and turns off once it gets the marbles close enough to where they need to go.
This same effect could have been accomplished with a Volume Field, however, due to the fact that this scene was created in Maya 2014 and I am currently using Maya 2016, there is a discrepancy that will not allow me to use that type of field in this scene.

Simulations take up a lot of computing power, and therefore everything becomes quite slow if you do not bake the animation of your objects intermittently throughout your progress.
When I would finish a complex scene and find an area in which I wanted to lead off, I would select the objects I had simulated and I would bake them. Baking an object is basically telling the computer to record the motion that is taking place in the live simulation, and it records the motion by setting keyframes on every frame. Sometimes, this must be done once or twice to get the perfect result, as every simulation is different every time since it is computing in real time. Once the bake has taken place and the simulation has been recorded through keyframes as animation, the constraints, the forcefields, and the rigid bodies can be deleted. This speeds up our progress quite a lot.

Using these methods and functions, I was able to complete the entirety of the marble scene and add my own style to it.
I decided to take each object into Substance Painter and apply textures. They are high quality textures, yet my render was not set to a high enough quality to perfectly capture them, so you will see some issues throughout the final render depending on the distance of the camera from the objects.

To create two strings in the scene, I created a tube object and constrained the end of each tube to the thing I wanted the string to be attached to. I then simulated a piece of string with nCloth, and the animation drove the movement of the simulated string. The animation of the strings were baked out just the same way that the rigid body objects were baked.

Overall, I was able to create this great and dynamic scene by using a variety of the incredible function that Maya offers for simulations. It was a great process and a good learning experience.


Friday, May 27, 2016

Software Technology

Below is a blog I wrote after finishing Software Technology class at Full Sail University. Listed here and most of my projects I did this month while taking the class, and some information on how some things were done.

The software we worked in was Autodesk by Softimage and Houdini by SideFX, and below is kind of a written version of the journey. I had incredible instructors and was given access to extremely valuable information throughout the course of the month. Including information on freelance work, 3D printing, and how to produce high quality products from home. 


Software Technology:

This has been an absolutely incredible month in which I have gained incredibly valuable knowledge, not only in different software packages, but in new modeling techniques, and in areas of business as well.

I began this month by learning a Software by Autodesk called Softimage. This task was given by my instructors in a class I just took called "Software Technology." Now you would think that at a school that is always teaching the newest things, encouraging us to upgrade to brand new packages, and is focused on how the industry is moving forward, we would learn to work in some sort of brand new software on a project that would absolutely push the limits of technology! Though that may be the case sometimes, that was not how it went this month. We were introduced to Softimage.


Now Softimage is not a bad program at all, it is actually quite useful! But it's like Maya's little cousin, and once you know Maya and have to switch to a software like this, you realize how absolutely spoiled you've been. While you can accomplish quite a bit in Softimage, it definitely is not something I would ever encourage anyone to use above any other package that I've worked in. It has a lot of problems, but it causes you to really think your way around issues and become a creative problem solver. At the beginning of the month, I knew that my outlook on things would be changed and I knew that valuable information and ways of thinking would come of it, but muscling through it was a process in and of itself. I have learned though, that I can pretty much get down any software within about a week, and I'm glad to have another software package to add to my resume. 

One of my goals was to model a car in Softimage. I chose, of course, this beauty: 
         

 This was the reference photo used. I'll show the model a little bit closer to the end.

The first thing I modeled while getting used to Softimage was a fence. Each piece was done individually: The Post, the Picket, and the Rail.

Of course, they were very simple, as I was just learning the software. But doing something as simple as this can give you a great idea of how to navigate, operate, and model in a software you've never touched before.


The reason they were done separately was so they could be reassembled in Houdini later on.

Working in Houdini was absolutely fantastic! I love node based applications, and Houdini was extremely useful! I will definitely be using it quite a lot in the future. For anyone looking to get into the film or game industries, I highly recommend learning Houdini if it applies to your desired area of the field.

This month was my first time working in Houdini as well, so I did some procedural modeling of several objects, which helped me learn how to use Houdini as well. While I don't recommend using Houdini to model, it can be useful for specific things, such as the Koosh Ball and the object duplications seen below such as the fence or creating a hundred different randomly generated pieces of cheese. For things like that, it is absolutely wonderful to work with. 

Here is a model of a Panther Couch that was made in Houdini. 

Being a node based application, you can see that it took many nodes just to make a simple model. For working in a practical scenario, I recommend building your models in other packages, then importing them as OBJ's. That essentially would cut those 30 or so different nodes down to a single object node in which you could simply bring in the OBJ file.


Needless to say, why make life harder on yourself? Model in whatever package works best for you.
One case in which it really would be quite helpful is if you needed to create something such as a Koosh Ball with random extensions and colors. Being able to incorporate expressions that randomize things such as placement and color is an invaluable ability, and something that Houdini handles quite well.


As you can see below, the colors are randomized, the placement is pretty randomized, and the lengths of the strings coming off the sphere are all randomized as well.

The Koosh is extremely simple, as you can see in the node editor! WAY simpler than creating even a couch! And here's how it's done. 
The Point node is putting points all over the sphere. The Scatter node is then scattering those points all over the surface randomly, and the frequency of the scattered points can be adjusted and edited within the node. The Line node on the right is creating a path for the polywires to follow, and the lines are copied onto every individual point through the Copy Node. From there, the Sphere and Copy nodes are merged together and with the addition of randomized colors, we get our final product. 


Through a process that is actually shockingly simple if you understand Houdini well, the final result with the cheese looked like this:


With a little extra work, and a little more organization, (but using some of these same principles) I was able to create a beautiful set of Dominoes as well.


Houdini is absolutely fantastic with gravity and simulations, so after creating these, I was able to simply turn each domino into an RBD Object, then use an invisible sphere hanging from a Pin Constraint to knock over the first domino, which caused a perfect chain reaction.
The simulation will really chug and be slow with high poly objects, so I did the initial simulation on simple cubes the shape of the dominoes, then copied the animation of the simple primitives onto the dominoes. Operations like this work extremely well in Houdini, which makes it extremely useful.


Here's a more in depth look at the Domino project for those of you who may be interested.


One of my favorite uses for Houdini is probably this. By importing the OBJ's of the Fence Pieces that I created in Softimage, I was able to assemble the fence within Houdini. By creating a Curve and drawing it on a surface or a grid, I can basically draw where I would like the fence to be. Then you can put points on that curve and choose how far apart you want those points to be. Those points become the markers for where you would like the lay out the fence pickets and posts, and you can adjust how many pickets you want between each post, etc... With a setup like this, I can simply draw a curve wherever I want there to be a fence, and Houdini automatically calculates and places the fence where I want it to be. This is extremely useful in environment modeling and in other operations, and I am so looking forward to eventually using this in the professional world.


While working on all of these projects, I was also improving my vehicle as well and preparing to implement it into a Houdini scene in which I would crash it through a wall.

With a low resolution version of the vehicle, I was able to simulate the wall crash at an early stage so I could continue working on the high res model in Softimage.


The car finally turned out pretty well. I would personally call this a work in progress, but having been done in a software that has a lot of issues and is not quite as friendly as something like Maya, I feel it turned out pretty decent.

Left:
Final Car


Below:
Vehicle with Wireframe


Left:
Vehicle rear view. 


The final project for this month was to create a working marble machine. I was made the group leader for the project and was responsible for some modeling, running the simulation, and project assembly. We worked hard on it for the short time we had to make it, and had a great success.

The prop that I specifically focused on the most was the purple prop in the video below.
I could go into an explanation of all of the entire project, but instead I will quickly explain my prop. 
I wanted it to be like a working machine, so after modeling the prop itself, I made each individual step an RBD Object, and made the other pieces Static Objects. The wheel at the bottom was animated to spin, and being a Static Object, it would push the blocks up and down in an alternating manner.
In the beginning, during the simulation, the blocks would fly out and all over the place. When I did get them to work, they were extremely jumpy. The way I fixed this was by placing a constraint (the red) on each individual block that only allowed it to move up and down in the Y axis. This eliminated most of the jitter. I tried every constraint in Houdini that I believed would work, and the Slider Constraint proved to be the most helpful. With some tweaking, and by setting Friction and Dynamic Friction Scale to "0", I was able to eliminate all jittering whatsoever. 
I moved on with the project, and somehow when I arrived at the end and ran the simulation, the jitter had returned but not quite as much as before (and the pieces stayed in place).


Overall, the project turned out pretty well despite the jittering of the steps, and we were all pretty happy with our final product.

Here is a video of the completed Marble Machine:


Overall, here are the things I have taken away most from this month of study:
There are always things you don't know.
There are a thousand ways to do everything.
Having knowledge of software under your belt, even if it isn't the most common, can be extremely valuable and/or provide you with an extremely valuable learning experience.
And a whole lot more. 

I am currently working more on my own Character Models and building a portfolio.


Tuesday, February 2, 2016

Sculpting an Arm

How to Sculpt a Usable 3D Arm


So what does it take to create a perfect, usable object in 3D? I'll tell you! It takes a hell of a lot of work!

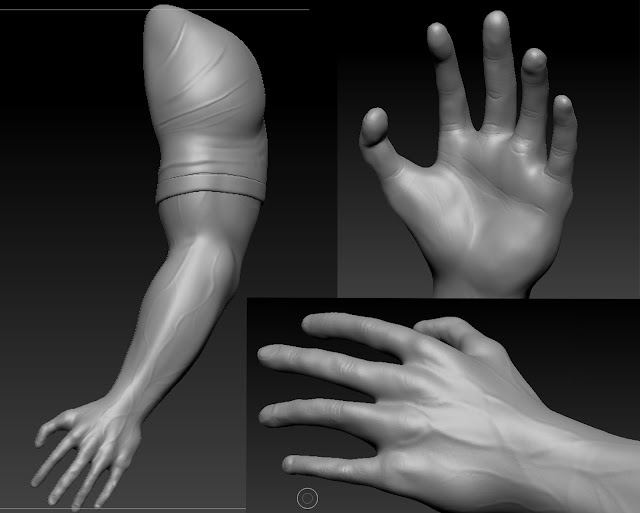
What you see above is the sculpture nearing its completion in Zbrush, but what looks like a finished product is often only the beginning. While it may be aesthetically pleasing and produce a fine artistic result, in its current form it is still not able to be used in actual production.

In the picture above, the object is made up of several million polygons. The trick is how to get it down to just a few hundred polygons while allowing it to retain the shape, and allowing it to keep the same amount of detail you see above.

So lets go back to the beginning. How does any successful work of art begin? With reference!


In The Beginning:

I knew from the beginning that I wanted to create a realistic and detailed arm that could be usable in production. To begin sculpting, I would need to have as much reference as possible to keep me on top of things. Now I could have used my own bulging muscles as reference, just glanced down at my gleaming, mountainous biceps every couple of minutes or so, and sculpted accordingly... But I decided to take it a step further, to go above and beyond, and search for reference beyond my own tendinous plateaus.

I went to the wondrous place called the internet and searched for images pertaining to the object I desired to create.

First I looked for muscular arm reference and gathered the photos I knew would be the most useful to me.


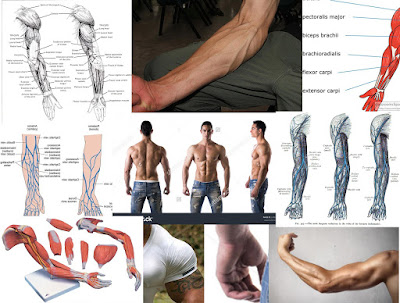
I knew I would have to work based on both photo reference and material that described the muscles and veins beneath the skin as well. When working on a successful model, you cannot just model what you see on the surface, but you constantly have to imagine what is underneath. You have to know what is underneath. Being able to have a comprehensive understanding of both the inside and outside of the subject you are creating will allow you to create characters, creatures, and objects that have more than just a surface level feeling to them. We are imitating life, and life is no surface level expedition. To truly live is to see and experience things to their core! So while we ultimately are creating surfaces, we must always model as though our created objects have depth, substance, and a core. You must believe that more lies beneath, or your audience never will.

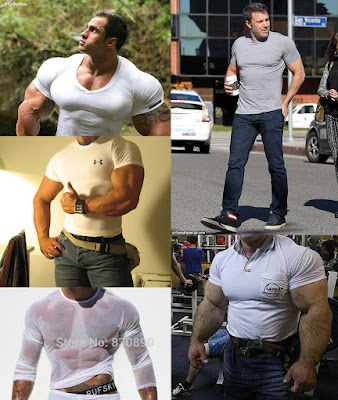
After collecting reference images for the arm and muscles, I searched for images pertaining to cloth and shirts, because I knew that my arm was going to have a sleeve on it as well.

Disclaimer: [While many of these photos found were needlessly sexual and looked like advertisements for succulent human hamburgers, I assure you that all I searched for was "muscular men wearing tight shirts"...] And let me assure you, in cases like this, Google's Safe Search option is a Godsend.


Sculpting:

So now it is time to start sculpting! I decided to use the image in the center of the Muscle Reference Collage above for my main muscle reference.
I imported the image into Zbrush and began working.
I started with ZSpheres, which make blocking out an object extremely quick and easy. While I had used Pixologic's Sculptris software in the past, I had never touched Zbrush. So while I was familiar with 3D sculpting and the process, getting used to the Zbrush interface did take some time. Once I had it down though, ZSpheres were extremely efficient and easy to work with.

I used ZSpheres to sculpt the base from the shoulder down to the wrist. In retrospect, I wish I would have used the ZSpheres to form the hands as well, as I formed the hands using just the basic tools in Zbrush and did them entirely from scratch. Getting the hands and fingers correct took me the longest because of the way I chose to work. I know now that in the future, I should block them out with the rest of the arm as well rather than trying to add them in later.

After getting the basic shape of the arm using Zspheres, I began using Dynamesh to sculpt out the shapes a little bit more (based on the reference) and then pulled out the hands and fingers and continued Dynameshing to keep the density of the topology even.

After hours of working, I eventually ended up with something that looked like this!

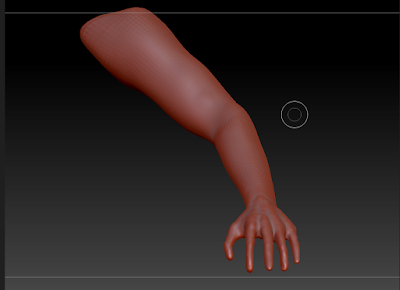
Nice, right?! Finished?! ... Not even close!

As you can see here, I have a pretty basic arm with a hand that has a little more detail than it probably even should at this stage. But that's okay! The hand looks very boney at this point, which helps me imagine the bone structure beneath. Later on, I will be able to add muscles over top of that bone in a realistic way.

At this point, I have very basic details. Beforehand I had broken the arm down into different major pieces to help me think of how I would create it. The edge flow when resurfacing would need to follow the gaps in between the blue pieces. I marked where the finger joints would be with red circles. This wasn't extremely necessary, but just something I did really quickly to help me get the idea of the Primary Form.


Then I wanted to study the object a little bit more, so I took note of the Secondary details such as the muscles and joints. I needed a good idea of where they all existed before I could begin creating them, so I mapped them out.


In addition to all this, I would focus on the Tertiary details; the smaller things like wrinkles, nails, veins, etc. After sculpting out the Primary and Secondary Details, I would add the Tertiary. In many things in life, you start small and work your way up. In art, you do exactly the opposite! Start with the big and work your way down to the small.


After Hours of Sculpting Later:

I added detail to the arm, gave it veins, carved wrinkles into the skin, gave it a skin-like texture, and made it as lifelike as possible. After some extra work, I had made a sleeve as well. My arm had gone from very basic to very detailed. Below is the same arm, once before I had even begun working on the Secondary Details, and the other is when it was completed with both Secondary and Tertiary Details. As you can see, there are some major differences. 


As we know, these objects are made up many tiny little shapes. So what does the mesh actually look like? Well let me show you!


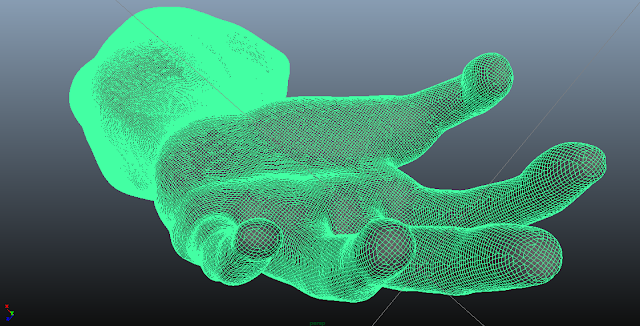
Yes, ladies and gentlemen, this arm (sleeve not even included) is currently made up of 1.3 million tiny tris. And this is the version saved at a lower resolution than the original.

Obviously, something like this can't be rigged or animated, so we have to make it able to be rigged and animated!


This is how we do that!

The Magic of Resurfacing:

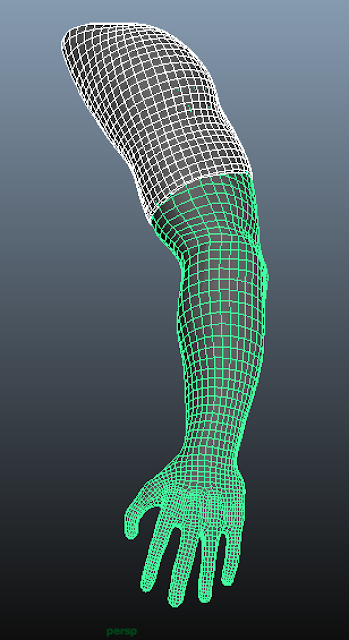
After this, I had to retopologize the entire thing. Basically, by going in and rebuilding the object using geometry that computers can actually handle. An artist will use a number of tools to accomplish this, and it takes many hours and a lot of concentration.

Basically, he will redraw over the object, how the shapes SHOULD look. So instead of millions of tiny triangles, we will end up with several hundred organized squares!


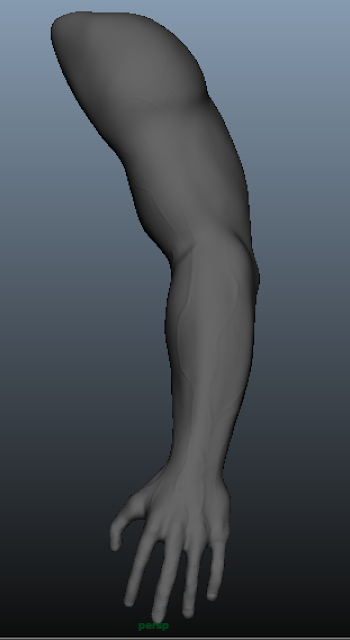
Eventually, we end up with this!


An arm that holds the exact same basic shape, but does not have any of the major details that the other one did.

Now we have to give this arm the illusion of having the same amount of geometry and detail that the complicated one did.

We do this by baking normals from the high resolution object onto the object that has a lower resolution.

Before we can bake normals onto an object, we have to lay out the UV's.

UV's are basically like... maps. You know how the globe is round and has coordinates, yet we take those coordinates and images and make them into flat maps. When you lay out UV's, you are essentially taking a globe and turning it into a piece of paper while keeping the details and information in tact.

When the UV's are done being laid out, (and these ones are very messy, so don't judge me too hardlybased on this), they will look something like this:
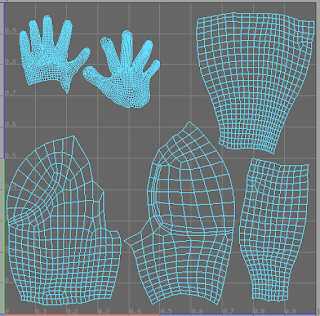
So there! It's basically a map split into pieces that holds the coordinates of the arm!

So if I were to put an image of a smiley face beneath the palm of the hand, a smiley face would appear on the palm of the hand of the actual model.

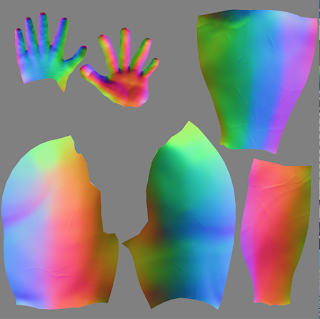
So what I want to do now is take all of the information of the high resolution model, stretch it out, and project it onto the UV's. (This is essentially what baking a 3D object does)

When you bake an object, you end up with the "Normals." The normals hold information from the high resolution object that will be projected onto the low resolution object to give it the illusion of complexity and detail.

The normals look like this:


Once everything has been pieced together, an object that actually looks like this:


Now has the illusion of being as detailed as this:


When in reality, it only looks like this:


And the final product looks THIS pretty:

And it can now actually be used by riggers and animators to make beautiful masterpieces for years to come! (Or probably just for the next week)


It's Nowhere Close to Perfect:


I'll be honest with myself and say that this is nowhere close to perfect.
If I didn't have a deadline, didn't have a sometimes full-time Job with the biggest entertainment company in the world, and if I had the ability to put into this project what it deserves:
The edge flow would be better, the anatomy would be better, the level of detail, the UV's, the final product would have been better. But the important thing is that I completed it and I learned.

I learned how to make sacrifices and how to keep focus in the areas that need it while working under a tight time frame.
I learned that skimping in the beginning makes things harder on you later on, so even when working on a base mesh, work on it with passion and attentiveness!
I learned that there are a thousand different ways to bake normals, and only one way is ever actually right.
I learned that hard work pays off.
I learned many things.

But I think that the thing that most affected me was this: When I tried to think about all the technical aspects 100% of the time, I only drove myself crazy and got absolutely nowhere. But when I stepped back, took a breather, turned on some music and began creating this as an expression of myself, it became easy and like a breeze.
Any time an artist separates himself from his art, he struggles.
I took a moment to write down my feelings in the middle of this process at one point, and I'm glad that I did. I wrote:

Every artist must struggle until he realizes the pinnacle of creativity; of true discovery and success, lies not in his ability to conquer or to pin down his art form, but in his ability to feel what exists within himself. Art is about seeing, but not with our eyes. It is about seeing beyond the skin of reality and being able to create things not just surface level, but knowing them to the core. Most importantly, you must know yourself. The less spiritual an art form becomes to you, the more you will struggle in the act of doing it. When you let your art become a living, breathing thing in your heart and imagination, there is no limit to how far you can go in reality. This goes for all things worth doing in life.

Those words carried me through this entire process and made it possible.

I hope that every artistic experience I have becomes a learning process for me. If I am creating something new, I am learning, and that is part of what drew me to art to begin with.


-Britain V.

02/02/2016